There are a wide variety of knife sharpeners out there, but not everyone knows how to properly use a knife sharpener in order to get the best performance out of their blade. If you’re trying to figure out how to use a sharpener, you’re probably working with a honing rod, an electric sharpener, or a pull-through sharpener.
Different types of sharpeners produce vastly different results. In general, I recommend avoiding pull-through style sharpeners altogether (more on that later). Here, I’ll review how to:
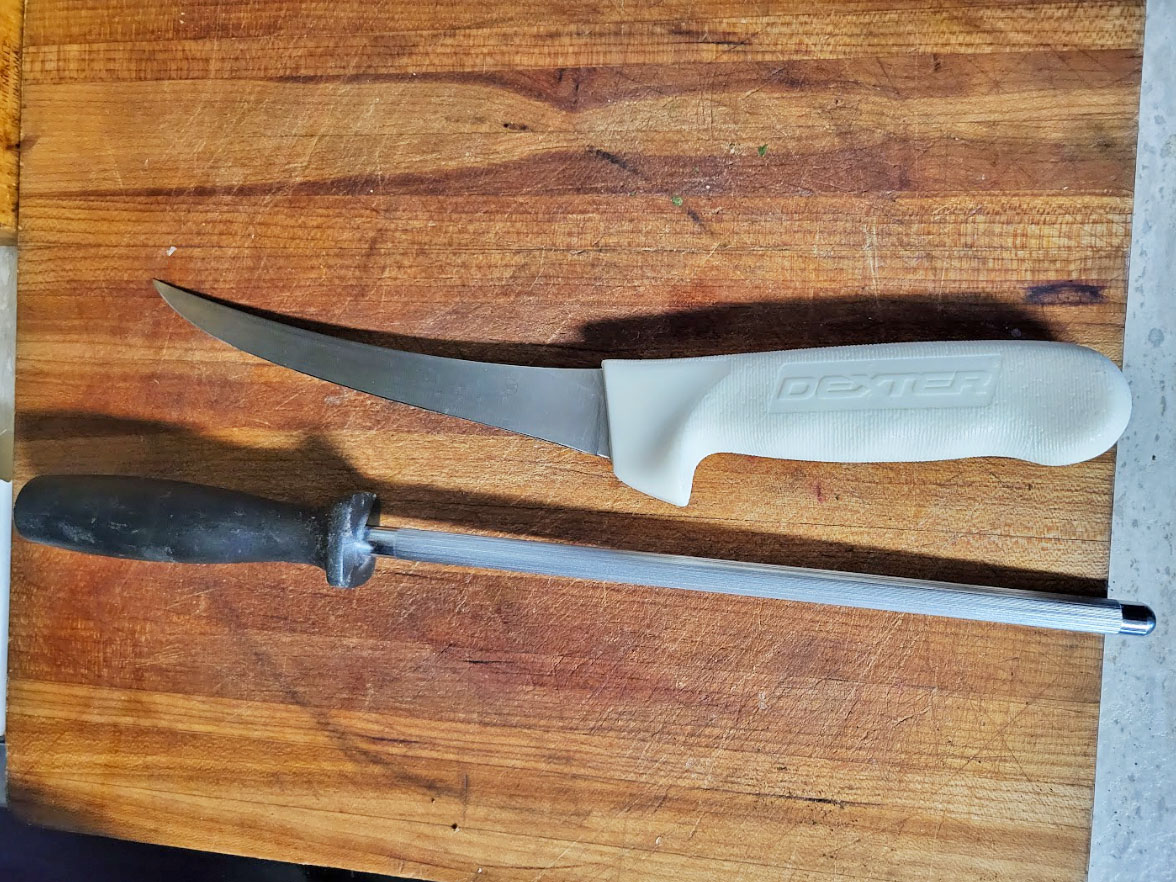
Honing Rods for Sharpening
Everyone has seen a chef or a butcher rapidly running a blade along a metal honing rod before they start cutting. I used to think that those rods were sharpening the knives that they were using, and I also thought “how do they do that so fast?” Well, the speed is attainable with some practice, but the question as to whether or not those knives were actually being sharpened is harder to answer.
Honing steels, whether they are smooth or grooved, don’t always “sharpen” a knife, which is to say they don’t remove material from the edge. Many steel hones just straighten out minor rolls and deformations in the edge of relatively soft steeled knives. Most commercial kitchen and butchering knives are (relatively) soft stainless steel blades, that will pick up small edge deformations when they contact bone or other hard substances or surfaces. By running a steel hone across both sides of the edge several times, those small imperfections get straightened out, and the cutting performance is improved. So, many hones aren’t actually honing, they are just straightening out minor rolls and deformations in the edge. It should be noted that these types of hones won’t be too effective on high-end hardened steels because the tiny spot of pressure that straightens softer steel can chip a hardened steel with too much pressure.
However, there are hones that actually hone the edge by removing material to effectively sharpen the edge, instead of straightening it. Some grooved steel hones have “sharp” edges that will shave off tiny bits of steel, while other honing rods are made of ceramic, or have a diamond coating to remove material. Theses are the types of honing rods that I prefer for maintaining the edge on knives because they can be used like a whetstone to produce a fine edge and remove chips or other edge damage on higher hardness steel.
How to Use a Honing Rod
There are several methods that can be used for sharpening a knife with a honing rod, but we will walk through the one I use most commonly because it is the easiest for starting out. In my opinion, it’s also the easiest to get consistent results with.
Step 1: Position the Honing Rod
Hold the honing rod by the handle with the other end pointing straight down. Place it on a level surface that won’t damage the edge. I use either a wooden or plastic cutting board for this. I’m not sure why glass cutting boards were ever made, but don’t use one of those. It will dull your knife instantly, plus the honing rod could break it.
Tips: It’s likely that some metal shavings will make it to the board, so be sure to place a paper towel under the hone, or wash the board before using it for food prep.
Step 2: Find the Angle
Find the angle at which you want to sharpen your blade. Most kitchen and butcher knives will be between 15 and 20 degrees per side. It helps to mark the edge of the blade with a marker so you can see where the hone is contacting the edge. This way, you can adjust to a steeper or shallower angle after a couple passes on the hone. For a rough idea of where to start, you can hold the blade to the hone at a 45-degree angle, and then bring that angle down by a little more than half. Repeat this step for the other side of the edge, on the other side of the hone.
Step 3: Make a Few Passes
Once you have an angle, you’ll make a pass on the hone. Start with the heel of the knife up at the handle of the hone and make a steady pass down toward the cutting board while pulling the blade toward you. You should start at the top of the hone at the heel, and end near the bottom of the hone at the tip of the blade.
Depending on the hone, you may need to make a few passes before you get a good idea of where you’re contacting the edge. If you are contacting the whole edge bevel, just keep up the good work and maintain that consistent angle. If you need to adjust the angle, just make small adjustments until you’re there. Repeat this step for the other side of the edge. Keep the hone as straight up and down as you can to help keep your angle consistent.
Step 4: Raise a Burr
Raise a burr on the edge. This step is sometimes optional. If your knife is dull, you should raise a burr to make sure that you have reached the apex of the edge along the length of the blade. This is done by making repetitive passes on one side of the hone until you feel a slight burr along the whole edge. It may take a few passes, or it may take a few dozen, depending on the blade steel and how damaged the edge is.
Once you raise a burr on one side, be sure to raise one on the other side before moving on to the next step. Raising a burr is optional when your knife is still fairly sharp and undamaged, but you just want to bring it back to perfect sharpness. If that is the case, and if you know the angle on the blade from previous sharpening, you can skip raising a burr.
Step 5: Remove the Burr
Once the edge angle is established by raising a burr on both sides, you can go to alternating strokes on the hone. Make one pass per side until the burr is gone and you have your desired level of sharpness. Depending on the steel, you may even see a very thin “wire” of metal flaking or peeling off the edge, which is the burr you made being broken off by those alternating passes. Take your time and keep these passes as even and consistent as possible for the best result.
As with most sharpening techniques, using a hone will take some practice, and a consistent angle is key to getting a good edge on your blade. Hones have the advantage of not needing water, oil, electricity, or lots of space to use. A nice hone and a steady hand can give you solid results when you’re in the kitchen or in the field.
Read Next: How to Sharpen a Knife
How to Use an Electric Sharpener
Electric sharpeners can be a great way to sharpen your knives, with some of them producing excellent, polished edges that can shave hair. There are several types of electric sharpeners on the market today, but I will be focusing on the most popular type, which is a belt sharpener. There are both freehand and guided belt sharpeners, and in the steps below, I will explain both.
Step 1: Pick Your Belt
Determine how dull your blade is so you can select the correct belt to start with. Belt sharpeners come with a number of belts with different grits that remove material faster or slower. A lower grit should be chosen for knives with edge damage, or knives that you want to change the edge angle on. Lower grits give you fast results and help keep the heat down for repairing broken tips, chips and rolls, or reprofiling an edge. If your knife isn’t damaged, but just doesn’t cut as well as it did, then you can select a finer grit for just honing your edge without removing as much material.
Tip: When learning the ropes, it’s helpful to choose a finer grit because it removes material more slowly. With the coarse belts, I have seen people get into trouble pretty quickly, especially near the tip and heel of the blade. When you really get your technique dialed in, then you can speed up with the lower, coarser grits. Take your time while learning.
Step 2: Select Your Edge Angle
Select the angle at which you want to sharpen your blade. Belt sharpeners usually have guides or references for selecting an angle, which helps you keep consistent. Generally speaking, kitchen knives and knives that will be used mainly for slicing will have an edge angle between 15 and 17 degrees per side. Knives for everyday use like pocket knives generally fall between 18 and 22 degrees per side. This steeper angle provides more strength and stability for harder use, but you may notice a slight decrease in slicing performance. I have found that 20 degrees per side is the best balance of sharpness and strength for most EDC and outdoor/ hunting knives. If you plan on chopping with your knife, or you tend to be really hard on your blade (by cutting through wires, or metal, etc.) then you may want to select an angle between 23 and 30 degrees per side. This leaves plenty of thickness at the edge and makes for a strong, stable edge. Cutting performance will decrease, but the blade will be much less likely to take heavy damage.
Read Next: Best Bushcraft Knives
Tip: Belt sharpeners produce a convex edge, which is stronger than other edge types. This means you can usually go a few degrees lower on your edge angle, and still keep the durability of a steeper angle. I tend to go on the lower side (or sometimes lower category) of these angle guidelines when putting a convex edge on.
Step 3: Set Your Speed
Select the speed for your sharpener, if available. Many belt sharpeners have selectable speeds, and I like to keep the speed just about at the bottom of the range for keeping the heat lower. Also, if the speed is set lower, any slip up or mistake you make will have less consequence. Having your speed all the way up, especially when learning this skill, is a recipe for a burned edge or rounded tip.
Tip: If you see any discoloration while sharpening, you are getting the blade too hot, and likely negatively affecting the heat treatment. A cup of water nearby can cool off the blade if you find that it is hot to the touch. A quick dip after each pass will help. But, using the right speed and pressure is the preferred method for keeping temps down. Water should only be used for bigger repairs where heat build up is inevitable.
Step 4: Raise a Burr
At this point, you’re all set to start sharpening, and you can raise a burr on the edge. This is also known as “apexing” the edge. For a guided system, select a side and set the knife in the guide starting at the heel of the blade (near the handle) and pull the knife back toward you, taking 1 to 2 seconds to make the pull. As you get near the tip, slightly raise the handle to keep the belly of the blade close to parallel to the surface of the table or bench you’re on. For a freehand system, you will be making almost the same motion, but the knife will be on its side, rather than up on edge. I keep one hand on the grip, and my fingertips from my support hand out near the tip of the blade for pressure and angle control. Keep light down pressure on the blade, and rotate the handle to keep the belly roughly perpendicular to the belt.
After your first pass, check the edge by gently sweeping your thumb perpendicular to the edge starting from the side you didn’t grind and moving toward the side you did. Many times, you will be able to see the burr on the coarser belts, especially with softer steels. You must apex the entire edge before moving on to the other side. Feel for the burr along the whole edge from heel to tip. This may take several passes on the same side before you get a burr.
Once you apex on one side, repeat this step on the other side of the edge.
Tip: When sharpening the tip, many people either pause too long, or sweep the handle up too high and end up rounding off the tip. This is especially true when people are first learning to use belt sharpeners. To avoid this on guided systems, don’t raise your handle more than an inch or two, and keep speed and pressure consistent. For freehand belt sharpening, lift the whole knife off of the belt as you sweep to the tip and don’t raise the handle first. It’s easy to raise the handle faster than the blade, which increases your angle at the last second, rounding the tip. I also recommend that you practice on some cheap knives before sharpening your favorites.
Step 5: Use Finer Belts
Once you have apexed both sides of the edge, you can repeat Step 4 for the remaining belts that you have. Move to the next finer belt, and do the same thing. This will make the grind marks finer and finer as you move through the belts, which gives you a more and more refined edge. When you get to your finest belt, go to the next step.
Tip: As you get to finer belts, the burr will be less and less pronounced, and you may have difficulty detecting it. This is normal. The burr will be totally removed by the time you finish sharpening. If a burr isn’t removed, your edge may feel sharp for a short time, but the burr will fold over and quickly feel dull, or it will fall off and reveal the unfinished edge.
Step 6: Remove the Burr
Now you remove the burr and refine your edge. When you get to your finest grit belt, you will make alternating passes on your knife. One pass per side, back and forth. At this point, you aren’t checking for a burr (these fine belts won’t even raise a burr). You are just polishing and refining your edge. So, make one pass per side for several repetitions. You can use the same method used for checking for a burr to check your edge. You will know that the burr is gone when the edge feels the same when swiping from each side. If one side “grabs” more, then a burr is still present, or you didn’t quite apex it in that spot.
For this final belt, I am generally making about 10 passes per side for 20 total passes. Then I check to make sure the burr is gone. You may need more to get the right feel.
Check your sharpness by slicing some magazine paper. It should glide through cleanly without any hang-ups. If the paper tears, it’s because you didn’t remove all the damaged spots or fully remove the burr. There will be some trial and error while sharpening, and that is ok. Keep practicing and take your time.
Tip: Get yourself a quality leather strop and stropping compound to finish all your blades, no matter what method you use to sharpen. A strop will take your edge to the next level, and is a great way to keep blades sharp in between sharpening. The less you sharpen your knife, the longer it lasts. Too much sharpening will shorten the blades life by removing more material.
Why You Should Avoid Pull-Through Sharpeners
There are, of course, other knife sharpening tools, like pull-through sharpeners, that don’t require water, oil, electricity, or lots of space. Many people enjoy the convenience and compact footprint of these sharpeners. They don’t require skill or practice to use. But, pull through style sharpeners have some major drawbacks which cause me to avoid them at all costs.
The majority of pull through sharpeners do their job by having two carbide blades arranged in an overlapping “V” shape. As you pull the knife from heel to tip, the blades scrape off material from either side of the edge and cut the steel to the preset angle the blades are arranged at.
The first problem is that these sharpeners always leave a burr on one side of the edge. The carbides have to overlap and the second carbide will raise a burr that won’t be removed. Some sharpeners try to address this with a set of ceramic hones positioned in a “V” to remove the burr, but they don’t work well, in my experience.
Secondly, the carbide blades tend to “chatter” along the edge and make a wavy, almost serrated edge in places, especially near the heel of the blade. I have had quite a few blades come to my sharpening business that had these awful chatter marks from pull through sharpeners. The customers would complain that the knife just wouldn’t cut like it used to. Some blades had deep gouges from pulling the knife through a little tilted or crooked, and several needed extensive repair.
Thirdly, the edge angles are not adjustable, and are usually quite wide. Giving these sharpeners a wide angle makes them faster, because they will cut down at the edge without having to remove too much material, but the wider the angle, the lower the cutting performance. You don’t want splitting maul edge geometry on your felling ax. I don’t want 25-degree bevels on my hunting or kitchen knives that came from the factory at 15 or 18 degrees.
Lastly, these sharpeners just don’t do a good job. An edge can “feel” sharp with a micro burr for a short time, but the burr left behind quickly folds over and kills the edge’s performance. As an example, a friend of mine came over to help me butcher a couple whitetails I had hanging up, and he showed up with a commercial butcher knife and a pull through sharpener. He “sharpened” before we started, and three times during the process. My knife was good to go the whole time, and field dressed and butchered another deer later that season, never needing to be touched.
Read Next: Best Boning Knives
How to Use a Knife Sharpener Q&A
The best way to sharpen a knife depends on the condition of the blade and goal for your sharpening. Start by checking out our review of the best knife sharpeners and pick out one that meets your needs.
When using a pull-through style knife sharpener you pull the knife heel-to-tip through the sharpener. However, you should avoid this style of sharpener (see the next question).
Yes, pull-through sharpeners can damage blades.
Final Thoughts on How to Use a Knife Sharpener
Taking the time to learn how to sharpen with stones, hones, belts, and strops is well worth the trouble. Leave the pull through sharpeners out of the mix. You can get better, more consistent results with lots of other methods that won’t damage your edge, and will let you choose your angle.
If you want the portability of a small pull through sharpener for a backcountry hunt, there are ceramic hone rods or diamond stones that are the same weight and will do a much better job. Worksharp, in particular, makes some smaller ceramic hones that are perfect for touch ups in the field.
Whether you’re in the kitchen, or in the backcountry, a hone can be a great way to keep your edge sharp, and it will produce superior edges, remove less material, and be much less likely to damage your edge than pull through sharpeners.
Read the full article here